The difference between a home video production studio that produces professional-quality results and one that produces content that looks like it was filmed at home is not the size of the room or the budget of the equipment. It is the deliberateness of the design decisions — the specific choices about light, sound, background, and camera position that determine whether the filming environment communicates professional credibility or domestic informality.
Most creators and marketing teams who set up a home filming environment make the same sequence of mistakes. They choose the room based on availability rather than acoustic and lighting suitability. They position the camera based on where it fits rather than where it produces the best framing. They leave the background as it is rather than designing it as a visual communication asset. And they discover, after the first filming session, that the result does not match the professional standard they were aiming for — without being able to identify which specific decision produced the gap.
A professional home video production studio is not an accident of good equipment in a convenient location. It is a designed environment — one where every variable that affects the quality of the recorded image and sound has been deliberately considered, specifically configured, and documented in a repeatable filming standard that produces consistent professional results from every session regardless of the time of day, the season, or the weather outside.
In this video, Dallin Nead walks through the complete home studio design framework — covering every decision that determines whether a home filming environment produces professional results, in the specific order those decisions should be made, with practical solutions at every budget level from entry through professional.
Room Selection — The Decision That Determines Everything Else
The room selection decision is the most important home studio design decision — and the one made most carelessly by most creators. The room that is most conveniently available, largest, or closest to the computer is frequently not the room that is most suitable for professional video production. And a professional studio design applied to the wrong room produces a better version of the wrong result.
The four room suitability criteria
The right room for a home video production studio meets four specific criteria that determine whether the design work applied to it can produce a professional result.
Acoustic properties — the room's acoustic character determines how much of the ambient sound the microphone captures alongside the presenter's voice. Hard surfaces — concrete floors, tile, large windows, bare walls — reflect sound and produce reverberation that makes the audio track sound like it was recorded in a room rather than in a studio. Soft surfaces — carpeting, curtains, upholstered furniture, bookshelves full of books — absorb reflected sound and produce the drier, more controlled acoustic environment that professional audio quality requires.
The acoustic test for any candidate room is simple — clap once sharply and listen to the sound that follows. A room with significant reverberation produces a noticeable decay after the clap — the reflected sound that the microphone would capture alongside the presenter's voice in every take. A room with good acoustic properties produces a clean, quickly decaying response that indicates the soft surfaces are absorbing the reflected sound effectively.
Natural light controllability — the room's window configuration determines how controllable the natural light is during filming sessions. A room with large east-facing windows produces excellent soft morning light that becomes unusable by midday as the sun moves and the light quality changes. A room with north-facing windows — in the northern hemisphere — produces consistent, diffused indirect natural light that is usable throughout the day without significant variation.
The natural light controllability test is to assess whether the windows can be completely blocked — with blackout curtains or blinds — when artificial lighting is the preferred option, and whether the natural light available during the intended filming hours is consistent enough to produce repeatable results across multiple sessions without significant lighting adjustments between takes.
Background depth — the room's depth determines how much physical distance can be placed between the presenter and the background — which determines how much visual separation the camera's depth of field can produce between the foreground subject and the background environment. A room with insufficient depth forces the presenter close to the background, producing a flat, claustrophobic visual impression regardless of how well the background itself is designed.
The minimum background depth for a professional home studio is approximately eight to ten feet between the presenter's position and the nearest background surface. This distance provides enough separation for the camera's depth of field to naturally soften the background relative to the presenter's face — producing the visual separation that makes the presenter read as the clear foreground subject rather than as a flat element in a busy background.
Ambient noise level — the room's ambient noise environment determines the baseline level of background noise the microphone captures during filming sessions. Street traffic, HVAC systems, other household members, plumbing, and building mechanical systems all produce ambient noise that appears in the audio track and reduces the professional quality of the recorded sound.
The ambient noise test is to sit in silence in the candidate room at the intended filming time of day and listen for every sound source — the HVAC cycling on and off, the traffic outside the window, the refrigerator compressor in the adjacent kitchen, the upstairs neighbor's footsteps. Every sound identified in this test will appear in the recorded audio, and the feasibility of controlling or eliminating each source should be evaluated before committing to the room.
The Lighting Design — The Investment That Produces the Most Significant Visual Quality Improvement
Why lighting is the single most impactful home studio design decision
The professional quality difference between a home filming environment that looks professional and one that looks amateur is almost always a lighting difference. The camera, the background, and the presenter's wardrobe all contribute to the visual impression — but none of them produce the transformation that correct lighting produces in the visual quality of the recorded image.
Correct lighting for a home video production studio accomplishes three specific objectives — it illuminates the presenter's face evenly enough that the camera's exposure system can produce accurate color and skin tone representation without the shadows, hot spots, or color casts that poor lighting produces. It provides enough light on the presenter to allow the camera to be set to a low ISO value — which reduces the digital noise in the image and produces the clean, sharp visual quality that professional video requires. And it creates enough tonal variation across the presenter's face to produce the dimensional, three-dimensional appearance that flattering professional lighting creates — rather than the flat, shadowless appearance that direct front lighting or overhead ceiling lights produce.
The three-point lighting system for home studios
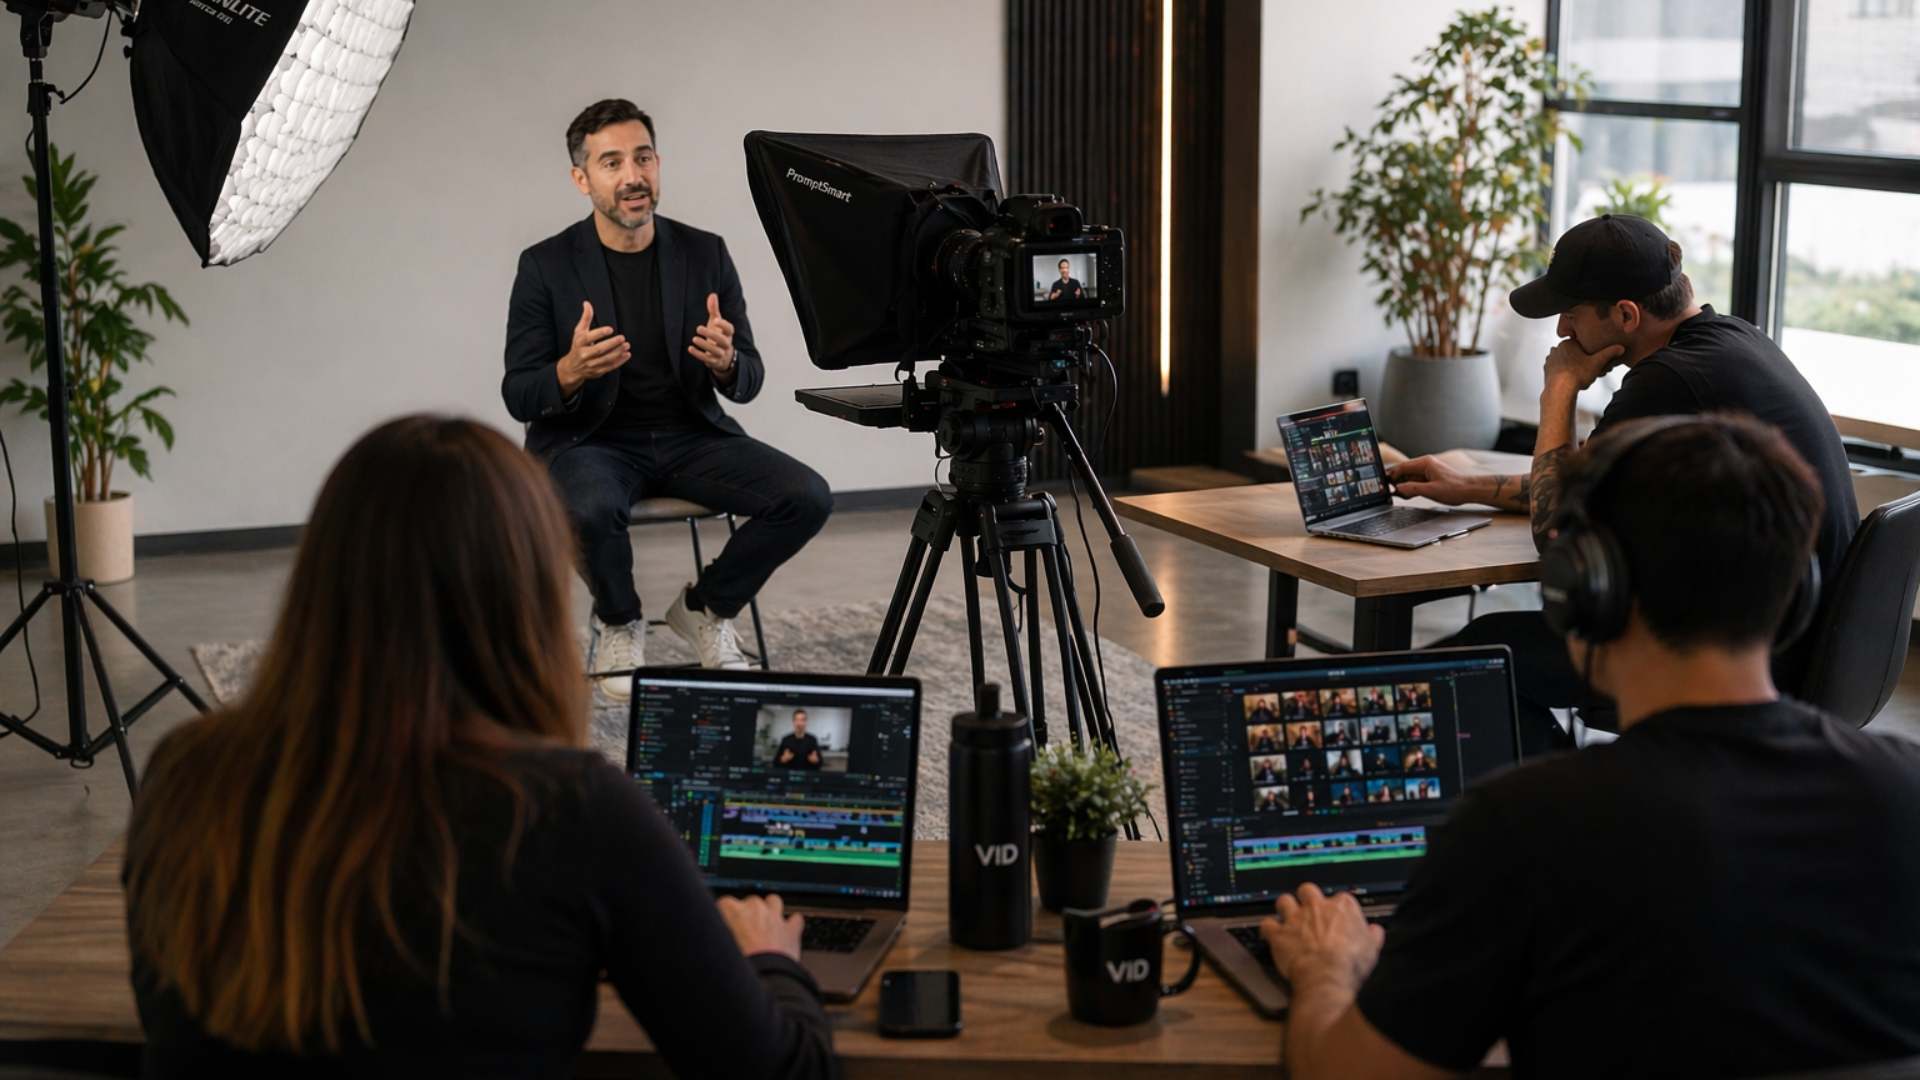
The three-point lighting system is the standard professional lighting configuration for on-camera interview and talking head video production — used in broadcast studios, corporate video productions, and professional home studios at every budget level from entry through broadcast standard.
The key light is the primary light source — positioned at approximately 45 degrees to the side of the presenter's face and slightly above eye level, producing the directional light that illuminates the face from the most flattering angle and creates the tonal variation that gives the face dimension and depth. The key light should be the brightest light in the setup and should be positioned close enough to the presenter to produce soft, even illumination without harsh shadows.
The key light equipment options at every budget level — a large LED panel with a diffusion panel for entry-level setups, a softbox-modified LED monolight for mid-level setups, and a professional LED fixture with integrated diffusion and color temperature control for high-end home studios. The specific positioning distances, heights, and angles that produce the most consistent professional results for different presenter skin tones and different room configurations.
The fill light is the secondary light source — positioned on the opposite side of the presenter from the key light at a lower intensity than the key light, reducing the depth of the shadow that the key light creates on the darker side of the presenter's face without eliminating it entirely. The ratio between the key light and the fill light determines the contrast level of the lighting — a 2:1 ratio produces soft, even lighting appropriate for most professional interview and authority content, while a 3:1 or higher ratio produces more dramatic, high-contrast lighting appropriate for specific creative treatments.
The fill light equipment options — a second LED panel at reduced intensity, a reflector panel positioned to bounce the key light back onto the shadow side of the face, or a foam-core reflector card as a zero-cost fill solution for entry-level setups. The specific fill light intensity settings and positioning adjustments that produce the standard professional lighting ratios for different content types.
The backlight — also called the hair light or the rim light — is the tertiary light source positioned behind and above the presenter, aimed at the back of the head and the tops of the shoulders, producing a thin rim of light that separates the presenter from the background and creates the visual depth that makes the presenter read as a three-dimensional subject rather than a flat element in the frame.
The backlight is the lighting element most commonly omitted in home studio setups — and its absence is the specific visual characteristic that most commonly makes an otherwise well-lit home studio setup look slightly amateur rather than fully professional. The backlight equipment options and positioning adjustments that produce the correct rim light intensity without causing lens flare or overexposing the back of the presenter's head.
Natural light as a substitute for artificial key light
For home studios with suitable window placement, a large north-facing or east-facing window can serve as the key light in a natural light setup — providing soft, diffused illumination that produces excellent results at zero equipment cost during the hours when the light quality is consistent. The specific natural light configuration that produces the best professional results — the presenter's position relative to the window, the window treatment adjustments that control the intensity and direction of the natural light, and the time-of-day windows during which the natural light quality is consistent enough for professional filming.
The specific challenge of natural light for home studio production is consistency — the quality, the color temperature, and the intensity of natural light change throughout the day, across seasons, and with weather conditions, producing variable results across filming sessions that make it difficult to maintain the consistent visual standard a systematic content program requires. The hybrid approach that uses natural light as the key light when conditions are suitable and supplements with artificial lighting when the natural light is insufficient or inconsistent.
Acoustic Treatment — The Investment That Produces the Most Significant Audio Quality Improvement
Why acoustic treatment is the most underestimated home studio design decision
Most home studio designers focus the majority of their design attention on the visual elements — the lighting, the background, the camera position — and address the acoustic environment as an afterthought, if at all. This prioritisation is backwards from the perspective of the viewer experience. Viewers will tolerate imperfect visual quality — slightly flat lighting, a less-than-ideal background, a suboptimal camera angle — for significantly longer than they will tolerate poor audio quality. Reverberant, noisy, or distorted audio produces immediate disengagement — a viewer who stops watching because the audio is hard to listen to never reaches the content that the production investment was designed to deliver.
The four acoustic treatment priorities for home studios
Reverberation reduction is the first acoustic treatment priority — reducing the amount of reflected sound that the microphone captures alongside the direct signal of the presenter's voice. The specific acoustic treatment materials that produce the most significant reverberation reduction per dollar of investment — acoustic foam panels, fabric-wrapped rigid fiberglass or rockwool panels, heavy curtains, and bookshelves filled with irregular objects — and the positioning strategy that treats the most acoustically reflective surfaces in the room without requiring full wall-to-wall coverage.
The minimum viable acoustic treatment for a professional home studio — the specific panel count, size, and placement that reduces reverberation to a professional standard in a typical domestic room without converting the entire space into a dedicated recording environment. The acoustic treatment priority sequence that produces the most significant improvement per panel installed — treating the first reflection points before treating secondary reflection surfaces, and treating the ceiling before treating the floor.
Bass frequency control is the second acoustic treatment priority — addressing the low-frequency buildup that occurs in room corners and produces a boomy, uneven bass response in the recorded audio. Bass traps — thick acoustic panels placed in the corners of the room where low-frequency energy accumulates — are the most effective and most commonly omitted acoustic treatment element in home studio designs that otherwise address mid and high-frequency reverberation adequately.
Ambient noise isolation is the third acoustic treatment priority — reducing the amount of external ambient noise that enters the room and is captured by the microphone during filming sessions. The specific isolation strategies that reduce ambient noise intrusion without requiring structural modifications to the room — door sealing, window treatment, and the strategic use of heavy curtains and furniture placement to create acoustic mass between the filming environment and the external noise sources.
HVAC noise management is the fourth priority — addressing the noise produced by the heating, ventilation, and air conditioning system that is one of the most common and most difficult ambient noise sources to eliminate in home filming environments. The specific strategies for reducing HVAC noise in the recorded audio — filming during HVAC off cycles, installing quieter HVAC components, and using directional microphone placement to minimise the HVAC system's contribution to the recorded audio track.
Background Design — The Visual Environment That Communicates Brand Before the Presenter Speaks
Why the background is a brand communication asset, not a decorative choice
The background of a home video production studio is not primarily a visual design decision — it is a brand communication decision. Every element visible in the background of a filmed video communicates something about the brand, the presenter, and the professional context in which the content is produced — before the presenter has said a word and often before the viewer has consciously registered the background as an element separate from the presenter.
A background that is cluttered, disorganised, or visually inconsistent with the brand's visual identity communicates a level of professional investment that undermines the authority the content is designed to establish. A background that is deliberately designed — with specific visual elements chosen for their brand communication value, their visual compatibility with the presenter, and their coherence with the brand's documented visual identity — communicates the professional standard that makes every piece of content produced in the environment feel like part of a systematic, intentional content program.
The four background design approaches for home studios
The clean environment approach — a simple, uncluttered background with limited visual complexity that keeps the viewer's attention on the presenter's face rather than on the elements behind them. The clean environment approach is appropriate for brands whose visual identity emphasizes simplicity, clarity, and professionalism — and for filming environments where the available space does not allow for a more elaborate background design without creating visual clutter.
The curated bookshelf approach — a bookshelf or shelving unit visible in the background, styled with a curated selection of books, objects, and brand-consistent visual elements that create visual interest without visual complexity. The curated bookshelf communicates intellectual depth, professional experience, and personal character — and it is the most universally appropriate background approach for authority content because it creates the impression of a workspace that reflects genuine expertise without the sterility of a bare wall.
The branded environment approach — a background specifically designed with brand visual elements — logo placement, brand color, branded objects and materials — that makes every video in the content program visually consistent with the brand's documented visual identity. The branded environment approach is appropriate for marketing teams building a systematic content program where visual consistency across every video in the library is a strategic priority.
The depth-of-field approach — a background with enough visual complexity to be interesting when in focus but designed to be sufficiently far from the presenter that the camera's depth of field renders it as a soft, out-of-focus visual impression rather than a sharply defined environment. The depth-of-field approach works best with a longer focal length lens that produces a shallower depth of field — separating the presenter sharply from a softly rendered background that provides visual warmth without visual distraction.
Camera Position and Framing — The Technical Decisions That Determine Visual Authority
Why camera position is the framing decision that most directly communicates presenter authority
The camera position relative to the presenter's eye level is the single most important visual framing decision in home studio design — because it determines the visual relationship between the presenter and the viewer in a way that communicates authority, approachability, and professional credibility before the presenter has spoken.
Eye level positioning — the camera positioned at exactly the presenter's eye level produces the visual relationship of equals — the viewer is at the same level as the presenter, producing the impression of a direct, peer-level conversation. Eye level positioning is the standard for most professional authority content and interview video because it produces the most natural and most approachable visual relationship between presenter and viewer.
Slightly above eye level — the camera positioned fractionally above the presenter's eye level produces a slightly more flattering angle for most presenters — reducing the appearance of under-chin shadow and producing a visual relationship that is slightly more intimate than exact eye level without the submissive quality of a significantly low camera angle.
Lens selection and focal length — the focal length of the lens used in the home studio determines the visual compression, the background separation, and the facial proportions visible in the frame. A wider focal length — below 35mm equivalent — produces a distorted, unflattering facial proportion that makes the nose appear enlarged and the face appear rounder than it is in person. A longer focal length — 50mm to 85mm equivalent — produces the natural facial proportions and the background compression that professional talking head video requires.
The Documented Filming Standard — The System That Makes the Studio Repeatable
Why documentation is the final and most important home studio design step
The most professionally designed home video production studio produces inconsistent results if the setup is rebuilt from memory rather than from documentation at the start of every filming session. The lighting position that produced perfect results in the last session is approximated rather than replicated in the next. The camera angle that produced the ideal framing is reset rather than reproduced. And the accumulated variation across multiple filming sessions produces a content library that looks like it was produced in slightly different environments — which undermines the visual consistency that makes a systematic content program feel professional and intentional.
The documented filming standard is the one-page reference document that specifies every element of the home studio setup — the key light position and intensity, the fill light ratio, the backlight position, the camera height and distance, the lens focal length, the background styling configuration, and the audio recording level — in enough specific detail that any team member can replicate the identical setup from the document alone without the guidance of the original designer.
The specific components of a home studio filming standard document, how to build it from the completed studio design in a single documentation session, and how to use it as the quality control reference that ensures every filming session begins from the identical professional baseline regardless of who sets up the environment or how much time has passed since the previous session.
Budget Levels — Professional Results at Every Investment Level
The specific equipment recommendations at entry, mid-level, and professional budget tiers
Every design principle covered in this video is achievable at three distinct budget levels — with different equipment, different material choices, and different implementation approaches producing equivalent professional results at each tier.
Entry level — under $500 total investment — the minimum viable home studio configuration that produces professional results using existing equipment supplemented by targeted purchases. The specific equipment choices at the entry level that produce the most significant quality improvement per dollar spent — the acoustic treatment priority that costs under $50 and produces the most significant audio quality improvement, the lighting addition that costs under $100 and eliminates the most common home filming quality failure, and the camera positioning adjustment that costs nothing and immediately improves visual authority.
Mid level — $500 to $2,000 total investment — the complete professional home studio configuration that produces results indistinguishable from a corporate video production studio for the majority of professional content applications. The specific equipment choices at the mid level that produce broadcast-standard audio and video quality from a domestic filming environment — the lighting system, the acoustic treatment coverage, the microphone configuration, and the camera and lens combination that together produce the professional standard that most B2B content programs require.
Professional level — above $2,000 total investment — the broadcast-standard home studio configuration that produces results equivalent to a professional commercial production facility for the most demanding content applications. The specific equipment additions at the professional level that produce the incremental quality improvements over the mid-level configuration — and the honest assessment of which professional-level investments produce meaningful quality improvements for typical B2B content applications versus which ones produce diminishing returns that are not justified by the incremental cost.
Who This Video Is For
Founders, executives, and marketing team members who are building a home video production studio and want a complete, practical design framework that covers every decision — room selection, lighting, acoustics, background, camera position, and documentation — in the specific order those decisions should be made and at the specific budget level appropriate for their production requirements.
Content creators at any stage of their video production journey who have set up a home filming environment and been frustrated by the gap between the result they are producing and the professional standard they are trying to achieve — and who want to understand which specific design decisions are producing the gap and how to close it without a complete studio rebuild.
And any marketing team that is building an internal video production capability and wants the home studio design framework documented as the foundational production infrastructure that every team member's filming setup is built from — so every video in the content library maintains a consistent visual and audio quality standard regardless of which team member is filming or where they are located.